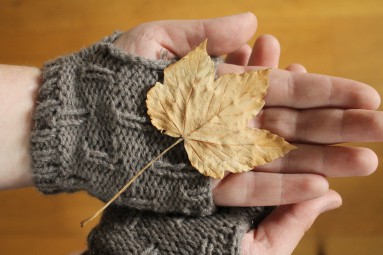
In this month's One Ball Challenge, Angie from GamerCrafting takes on the amazingly scrumptious Rowan Cashmere yarn! The result is a one ball, free fingerless glove knitting pattern that's perfect for autumn or holiday gifting.
It's officially September now, so I can start breaking out the pumpkin spice lattes and heavy knitwear - and I couldn't be more thrilled. While other people are mourning the end of summer, I'm ushering in the cooler weather the best way I know how - with cashmere.
Rowan Cashmere yarn is a new addition this season, and it's one of the most delicious yarns I've ever had the privilege to squish. With a mind-boggling 95% cashmere and 5% merino wool blend, it's also one of the most affordably luxurious yarns out there. (PS: when you order five balls of Rowan Cashmere, you get the pattern book designed by Martin Story for free!)
I'm a big fan of the one ball project - not only is it a dose of quick gratification, it's usually pretty simple, and it's an affordable option for holiday gift giving and last minute presents (Oh, Susie's birthday is TOMORROW?!).
I was inspired, in part, by the very cute (but very destructive) fuzzy green caterpillars that have taken up residence on my broccoli plants lately. I hope that if they eat my garden, at least the butterflies will be a pretty reminder of my inability to prevent insects from feasting on my hard work!

For this free fingerless glove knitting pattern, you will need:
One ball of Rowan Cashmere yarn in any shade (pictured in Marl Gray)
One pair of single pointed 4mm (US 6) needles
One tapestry needle for sewing up

Cast on
Cast on 38 stitches using the long tail cast on method.
Set up: knit 5 rows in a K1,P1 rib
Row 1: P1, *K1, P5*: repeat between ** until the last stitch, P1.
Row 2: K1, *K5, P1*: repeat between ** until the last stitch, K1.
Row 3: Repeat row 1
Row 4: Repeat row 2
Row 5: Repeat row 1
Row 6: Repeat row 2
Row 7: P1, *P3, K1, P2*: repeat between ** until the last stitch, P1.
Row 8: K1, *K2, P1, K3*: repeat between ** until the last stitch, K1.
Row 9: Repeat row 7
Row 10: Repeat row 8
Row 11: Repeat row 7
Row 12: Repeat row 8
You piece will now look like this:

These 12 rows make the stitch pattern. Repeat rows 1-12.
Knit 3 rows in a K1,P1 rib, and bind off in the K1, P1 pattern.
Now your flat piece looks like this:

Seaming up
To seam up your fingerless gloves, use the mattress stitch along the side, leaving a space for your thumb. Need some help with mattress stitch? This helpful video tutorial from KnittingHelp.com should help you out!
Weave in your ends, and voila! One simple pair of mitts.
Love this project? Pin the image below to share with your fellow knitters, and so you don't forget where you found it.

Happy Crafting!
Angie is a jack of all trades and a master of Netflix and video games. She talks about knitting, crochet, and creativity on her blog GamerCrafting, which also features free patterns. A musician by trade, a geek by choice, and a crafter by chance, you can't keep her away from her stash! Find her on Instagram @GamerCrafting, on Facebook, or on Twitter @AngelinaPanozzo.


